Events and Delegates
At the heart of Events in C# are Delegates. When an object generates an events, it must send the event out. The way that events are dispatched is through the use of delegates. Let's look how Events are declared in C#.
[attributes] [modifier] event type member-name;
- Modifier is any allowable scope modifier.
- Type must be a delegate.
- Member-name is the Name of the Event with which you will refer to the event in your code.
The important thing to note here is the delegate type that events should use. In the strictest sense, the delegate can be any legal delegate. But there is a convention that you should follow and is one that Window Forms uses. By Convention, the delegate should accept two parameters:
public event SubmitClickedHandler SubmitClicked;
The control we will create will contain a text box for your name and a button that will fire an event. To begin, open Visual Studio .NET and begin a new C# Windows Control Library. You may name it whatever you like, for this sample the project name will be SubmitButton.
using System;
using System.Collections;
using System.ComponentModel;
using System.Drawing;
using System.Data;
using System.Windows.Forms;
namespace Akadia
{
    namespace SubmitButton
    {
        // User Control which contain a text box for your
        // name and a button that will fire an event.
        public class SubmitButtonControl : System.Windows.Forms.UserControl
        {
            private System.Windows.Forms.TextBox txtName;
            private System.Windows.Forms.Label lblName;
            private System.Windows.Forms.Button btnSubmit;
            private System.ComponentModel.Container components = null;
            // Declare delegate for submit button clicked.
            //
            // Most action events (like the Click event) in Windows Forms
            // use the EventHandler delegate and the EventArgs arguments.
            // We will define our own delegate that does not specify parameters.
            // Mostly, we really don't care what the conditions of the
            // click event for the Submit button were, we just care that
            // the Submit button was clicked.
            public delegate void SubmitClickedHandler();
            // Constructor           public SubmitButtonControl()
            {
                // Create visual controls
                InitializeComponent();
            }
            // Clean up any resources being used.
            protected override void Dispose( bool disposing )
            {
                if( disposing )
                {
                    if( components != null )
                        components.Dispose();
                }
                base.Dispose( disposing );
            }
            .....
            .....
            // Declare the event, which is associated with our
            // delegate SubmitClickedHandler(). Add some attributes
            // for the Visual C# control property.
            [Category("Action")]
            [Description("Fires when the Submit button is clicked.")]
            public event SubmitClickedHandler SubmitClicked;
            // Add a protected method called OnSubmitClicked().
            // You may use this in child classes instead of adding
            // event handlers.
            protected virtual void OnSubmitClicked()
            {
                // If an event has no subscribers registerd, it will
                // evaluate to null. The test checks that the value is not
                // null, ensuring that there are subsribers before
                // calling the event itself.
                if (SubmitClicked != null)
                {
                    SubmitClicked();  // Notify Subscribers
                }
            }
            // Handler for Submit Button. Do some validation before
            // calling the event.
            private void btnSubmit_Click(object sender, System.EventArgs e)
            {
                if (txtName.Text.Length == 0)
                {
                    MessageBox.Show("Please enter your name.");
                }
                else
                {
                    OnSubmitClicked();
                }
            }
            // Read / Write Property for the User Name. This Property
            // will be visible in the containing application.
            [Category("Appearance")]
            [Description("Gets or sets the name in the text box")]
            public string UserName
            {
                get { return txtName.Text; }
                set { txtName.Text = value; }
            }
        }
    }
}
Using the control in a Windows form is trivial. It's just like adding any other control like a button or a DataGrid. First, create a new Windows Application project named: TestApp. Add a reference to the Submit Button User Control DLL named: SubmitButton.dll. Now you are ready to customize the Toolbox: Right-Click the Toolbox, .NET Framework Components, Browse, select the SubmitButton.dll.
The Submit Button User Control is now added to the Toolbox and can be inserted in Windows Form as any other control. Now we want to handle the SubmitClicked event for the user control. This will simply close the form. The control itself will take care of validation and the event won't be fired unless the text is valid. Click on the lightning-looking button (for events) with the control selected and you'll see the event, SubmitClicked, listed under the "Action" category. Click on it once and you'll see the description we added previously. Now double-click it and VS.NET will add an event handler SubmitClicked() which displays the name from the user control and close the form when the event is fired.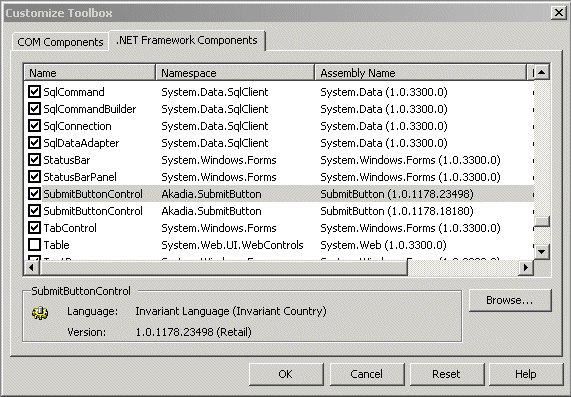
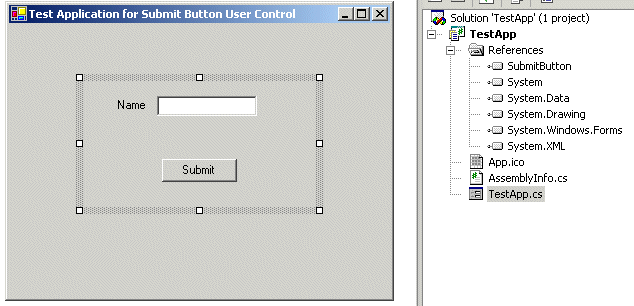 using System; using System.Drawing; using System.Collections; using System.ComponentModel; using System.Windows.Forms; using System.Data; namespace TestApp { // Test Application for the Submit Button User Control public class TestApp : System.Windows.Forms.Form { private Akadia.SubmitButton.SubmitButtonControl submitButtonControl; private System.ComponentModel.Container components = null; .... ..... [STAThread] static void Main() { Application.Run(new TestApp()); } // Handle the SubmitClicked Event private void SubmitClicked() { MessageBox.Show(String.Format("Hello, {0}!", submitButtonControl.UserName)); this.Close(); } } }
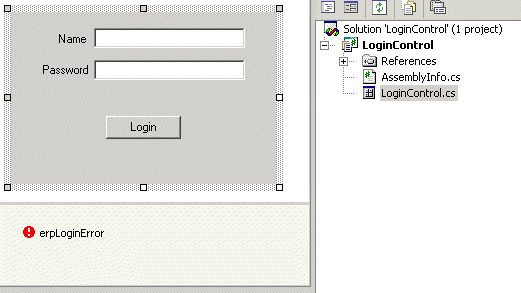
The following sample shows how to implement a Login user control. When the user clicks the Login button, the control will validate the data entered by the user. If the user has left either the User name or the Password text boxes empty, the loginError validation control will display an error icon against the offending control. The Password will then be checked by a "secret algorithm", if the Password is valid, the user control will raise an event called LoginSuccess; otherwise it will fire a different event called LoginFailed.In this sample we use the predefined System.EventHandler delegate. This delegate is useful if you want to define an event that has no additional data. The event will be passed an empty System.EventArgs parameter instead. This is the delegate used by many of the Windows Forms.
 using System;
using System.Collections;
using System.ComponentModel;
using System.Drawing;
using System.Data;
using System.Windows.Forms;
namespace Akadia
{
namespace LoginControl
{
// Implementation of a Login User Control
public class LoginControl : System.Windows.Forms.UserControl
{
private System.Windows.Forms.Label lblUserName;
private System.Windows.Forms.Label lblPassword;
private System.Windows.Forms.TextBox txtUserName;
private System.Windows.Forms.TextBox txtPassword;
private System.Windows.Forms.Button btnLogin;
private System.Windows.Forms.ErrorProvider erpLoginError;
private System.Windows.Forms.StatusBar stbMessage;
private System.ComponentModel.Container components = null;
// Here we use the predefined System.EventHandler delegate.
// This delegate is useful if you want to define an event
// that has no additional data. The event will be passed an
// empty System.EcentArgs parameter instead. This is the
// delegate used by many of the Windows Forms.
public delegate void EventHandler(Object sender, EventArgs e);
public event EventHandler LoginSuccess;
public event EventHandler LoginFailed;
// Constructor
public LoginControl()
{
InitializeComponent();
}
....
....
// This is the very simple Login Check Validation
// The Password mus be ... "secret" .....
private bool LoginCheck(string pName, string pPassword)
{
return pPassword.Equals("secret");
}
// Validate Login, in any case call the LoginSuccess or
// LoginFailed event, which will notify the Application's
// Event Handlers.
private void loginButtonClicked(object sender, System.EventArgs e)
{
// User Name Validation
if (txtUserName.Text.Length == 0)
{
erpLoginError.SetError(txtUserName,"Please enter a user name");
stbMessage.Text = "Please enter a user name";
return;
}
else
{
erpLoginError.SetError(txtUserName,"");
stbMessage.Text = "";
}
// Password Validation
if (txtPassword.Text.Length == 0)
{
erpLoginError.SetError(txtPassword,"Please enter a password");
stbMessage.Text = "Please enter a password";
return;
}
else
{
erpLoginError.SetError(txtPassword,"");
stbMessage.Text = "";
}
// Check Password
if (LoginCheck(txtUserName.Text, txtPassword.Text))
{
// If there any Subscribers for the LoginSuccess
// Event, notify them ...
if (LoginSuccess != null)
{
LoginSuccess(this, new System.EventArgs());
}
}
else
{
// If there any Subscribers for the LoginFailed
// Event, notify them ...
if (LoginFailed != null)
{
LoginFailed(this, new System.EventArgs());
}
}
}
// Read-Write Property for User Name Label
public string LabelName
{
get
{
return lblUserName.Text;
}
set
{
lblUserName.Text = value;
}
}
// Read-Write Property for User Name Password
public string LabelPassword
{
get
{
return lblPassword.Text;
}
set
{
lblPassword.Text = value;
}
}
// Read-Write Property for Login Button Text
public string LoginButtonText
{
get
{
return btnLogin.Text;
}
set
{
btnLogin.Text = value;
}
}
// Read-Only Property for User Name
[Browsable(false)]
public string UserName
{
set
{
txtUserName.Text = value;
}
}
// Read-Only Property for Password
[Browsable(false)]
public string Password
{
set
{
txtPassword.Text = value;
}
}
}
}
}
Create a new Windows Application project named: TestApp. Add a reference to the Login Validation User Control DLL named: LoginControl.dll. Now you are ready to customize the Toolbox: Right-Click the Toolbox, .NET Framework Components, Browse, select the LoginControl.dll.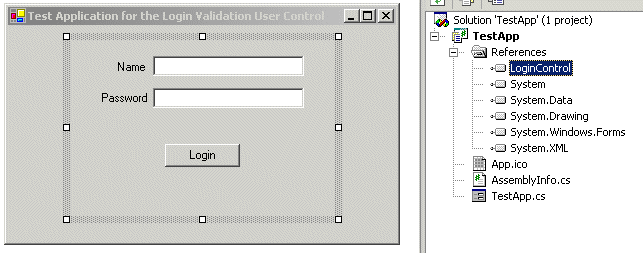 using System;
using System.Drawing;
using System.Collections;
using System.ComponentModel;
using System.Windows.Forms;
using System.Data;
namespace TestApp
{
// Test Application for the Login Validation User Control
public class TestApp : System.Windows.Forms.Form
{
private Akadia.LoginControl.LoginControl loginControl;
private System.ComponentModel.Container components = null;
....
....
[STAThread]
static void Main()
{
Application.Run(new TestApp());
}
// This Event is fired by the Login Validation User Control
private void LoginFailed(object sender, System.EventArgs e)
{
MessageBox.Show("Login falied ....", "Login Validation",
MessageBoxButtons.OK, MessageBoxIcon.Exclamation);
}
// This Event is fired by the Login Validation User Control
private void LoginSuccess(object sender, System.EventArgs e)
{
MessageBox.Show("Login success ....", "Login Validation",
MessageBoxButtons.OK, MessageBoxIcon.Exclamation);
}
}
}
An inherited control example is one for a custom masked text box. A masked text box is one that automatically formats the user's input into the correct format. For example, it may add dashes or brackets to make sure it looks like a phone number. This task is notoriously difficult. One useful tool is Microsoft's masked edit text box, which is provided as an ActiveX control with previous versions of Visual Studio.The example of a masked text box is important because it demonstrates how features (rather than data) might be added to an existing control by subclassing. The example is still quite limited-notably, it restricts deletions and the
use of the arrow keys. Tracking the cursor position, which is required to allow inline masked edits, results in a good deal of tedious code that only obscures the point.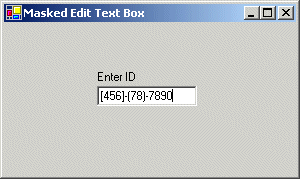 using System;
using System.Collections;
using System.ComponentModel;
using System.Drawing;
using System.Data;
using System.Windows.Forms;
namespace Akadia
{
namespace FormatMask
{
// Extended User Control to implement an Edit Mask Text Box
public class EditMask : System.Windows.Forms.TextBox
{
// Fields
private string _mask;
// Properties
public string Mask
{
get { return _mask; }
set
{
_mask = value;
this.Text = "";
}
}
// To use the masked control, the application programmer chooses
// a mask and applies it to the Mask property of the control.
// The number sign (#) represents any number, and the period (.)
// represents any letter. All other characters in the mask
// are treated as fixed characters, and are inserted automatically
// when needed. For example, in the phone number mask (###) ###-####
// the first bracket is inserted automatically when the user types
// the first number.
protected override void OnKeyPress(KeyPressEventArgs e)
{
if (Mask != "")
{
// Suppress the typed character.
e.Handled = true;
string newText = this.Text;
// Loop through the mask, adding fixed characters as needed.
// If the next allowed character matches what the user has
// typed in (a number or letter), that is added to the end.
bool finished = false;
for (int i = this.SelectionStart; i < _mask.Length; i++)
{
switch (_mask[i].ToString())
{
case "#" :
// Allow the keypress as long as it is a number.
if (Char.IsDigit(e.KeyChar))
{
newText += e.KeyChar.ToString();
finished = true;
break;
}
else
{
// Invalid entry; exit and don't change the text.
return;
}
case "." :
// Allow the keypress as long as it is a letter.
if (Char.IsLetter(e.KeyChar))
{
newText += e.KeyChar.ToString();
finished = true;
break;
}
else
{
// Invalid entry; exit and don't change the text.
return;
}
default :
// Insert the mask character.
newText += _mask[i];
break;
}
if (finished)
{ break; }
}
// Update the text.
this.Text = newText;
this.SelectionStart = this.Text.Length;
}
// base.OnKeyPress(e);
}
// Stop special characters.
protected override void OnKeyDown(KeyEventArgs e)
{
e.Handled = true;
}
}
}
}
Create a new Windows Application project named: TestApp. Add a reference to the Edit Mask User Control DLL named: FormatMask.dll. Now you are ready to customize the Toolbox: Right-Click the Toolbox, .NET Framework Components, Browse, select the FormatMask.dll.using System;
using System.Drawing;
using System.Collections;
using System.ComponentModel;
using System.Windows.Forms;
using System.Data;
namespace TestApp
{
// Test Application for the Edit mask User Control
public class TestApp : System.Windows.Forms.Form
{
private Akadia.FormatMask.EditMask editMask;
private System.Windows.Forms.Label lblText;
private System.ComponentModel.Container components = null;
public TestApp()
{
InitializeComponent();
}
......
private void InitializeComponent()
{
....
this.editMask.Location = new System.Drawing.Point(93, 63);
this.editMask.Mask = "[###]-(##)-#####";
this.editMask.Name = "editMask";
this.editMask.TabIndex = 0;
....
}
static void Main()
{
Application.Run(new TestApp());
}
}
}
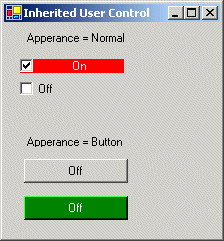
The Toggle Button User Control is an inherited control. When the user clicks a toggle Button, the Text and BackColor properties should be set according to the Checked state of the button. The natural place to do this is the Click event. However, keep in mind that you only want to extend the default Click event supplied with the CheckBox class rather than replacing is. In the .NET Framework documentation, you will be notice that controls typically have a protected OnXXX method that raises each event (where XXX is the name of the event) - for example the Click event is raised by the OnClick method. The Control call these methods when an event occurs. If you want to extend the Click event, the Trick is therefore to override the OnClick method.If the Appearance value is set to Appearance.Normal, then the check box has a typical appearance. If the value is set to Button, the check box appears like a toggle button, which may be toggled to an up or down state.
using System;
using System.Collections;
using System.ComponentModel;
using System.Drawing;
using System.Data;
using System.Windows.Forms;
namespace Akadia
{
namespace ToggleButton
{
// The ToggleButton class is inherited from the
// System.Windows.Forms.CheckBox Class
public class ToggleButton : System.Windows.Forms.CheckBox
{
// Fields
private string _checkedText;
private string _uncheckedText;
private Color _checkedColor;
private Color _uncheckedColor;
// Constructor
public ToggleButton()
{
// If Appearance value is set to Appearance.Normal,
// the check box has a typical appearance.
// If the value is set to Button, the check box appears
// like a toggle button, which may be toggled to
// an up or down state.
this.Appearance = Appearance.Button;
// Set Default toggled Text
this._checkedText = "Checked";
this._uncheckedText = "Unchecked";
// Set Default toggled Color
this._checkedColor = Color.Gray;
this._uncheckedColor = this.BackColor;
}
// Public Properties, can be accessed in Property Panel
public string CheckedText
{
get { return this._checkedText; }
set { this._checkedText = value; }
}
public string UncheckedText
{
get { return this._uncheckedText; }
set { this._uncheckedText = value; }
}
public Color CheckedColor
{
get { return this._checkedColor; }
set { this._checkedColor = value; }
}
public Color UncheckedColor
{
get { return this._uncheckedColor; }
set { this._uncheckedColor = value; }
}
// When the user clicks a toggle Button, the Text and
// BackColor properties should be set according to the Checked
// state of the button. The natural place to do this is
// the Click event. However, keep in mind that you only
// want to extend the default Click event supplied with
// the CheckBox class rather than replacing is. In the .NET
// Framework documentation, you will be notice that controls
// typically have a protected OnXXX method that raises each
// event (where XXX is the name of the event) - for example
// the Click event is raised by the OnClick method. The Control
// call these methods when an event occurs. If you want to
// extend the Click event, the Trick is therefore to override
// the OnClick method.
protected override void OnClick(EventArgs e)
{
base.OnClick(e); // Call the CheckBox Baseclass
// Set Text and Color according to the
// current state
if (this.Checked)
{
this.Text = this._checkedText;
this.BackColor = this._checkedColor;
}
else
{
this.Text = this._uncheckedText;
this.BackColor = this._uncheckedColor;
}
}
}
}
}
Create a new Windows Application project named: TestApp. Add a reference to the Toggle Button User Control DLL named: ToggleButton.dll. Now you are ready to customize the Toolbox: Right-Click the Toolbox, .NET Framework Components, Browse, select the ToggleButton.dll.using System;
using System.Drawing;
using System.Collections;
using System.ComponentModel;
using System.Windows.Forms;
using System.Data;
namespace TestApp
{
// Test Application for the toggled CheckBox und Button
public class TestApp : System.Windows.Forms.Form
{
private Akadia.ToggleButton.ToggleButton btnToggle1;
private Akadia.ToggleButton.ToggleButton btnToggle2;
private Akadia.ToggleButton.ToggleButton btnToggle3;
private System.Windows.Forms.Label lblText1;
private System.Windows.Forms.Label lblText2;
private Akadia.ToggleButton.ToggleButton btnToggle4;
private System.ComponentModel.Container components = null;
public TestApp()
{
InitializeComponent();
// Set Appearance to CheckBox
btnToggle1.Appearance = Appearance.Normal;
btnToggle2.Appearance = Appearance.Normal;
}
......
private void InitializeComponent()
{
this.btnToggle1 = new Akadia.ToggleButton.ToggleButton();
this.btnToggle2 = new Akadia.ToggleButton.ToggleButton();
this.btnToggle3 = new Akadia.ToggleButton.ToggleButton();
.....
}
static void Main()
{
Application.Run(new TestApp());
}
}
}


